详情请点阅读全文
一、视图(基于类的视图)
【参考】https://docs.djangoproject.com/zh-hans/3.0/topics/class-based-views/intro/
1)视图的功能
2.2 url配置的过程
1) 在项目的urls文件中包含具体应用的urls文件,在具体应用的urls文件中包含具体url和视图的对应关系。
2) url配置项是定义在一个名叫urlpatterns的列表中,其中的每一个元素就是一个配置项,每一个配置项都调用url函数。
3. url匹配的过程

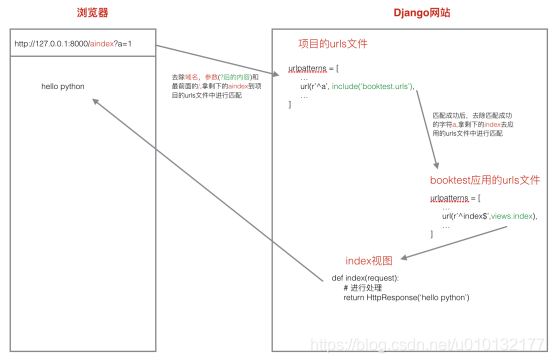
url:http://127.0.0.1:8000/aindex?a=1
1) 去除域名和后面的参数,剩下/aindex,再把前面的/去掉,剩下aindex
2) 拿aindex先到项目的url.py文件中进行从上到下的匹配,匹配成功之后执行后面对应的处理动作,就是把匹配成功的部分a字符去除,然后拿剩下的部分index到应用的urls.py文件中再进行从上到下的匹配。
3) 如果匹配成功则调用相应的视图产生内容返回给客户端。如果匹配失败则产生404错误。
4.错误视图
- 404:找不到页面,关闭调试模式之后,默认会显示一个标准的错误页面,如果要显示自定义的页面,则需要的templates目录下面自定义一个404.html文件。
- a)url没有配置
- b)url配置错误
- 500: 服务器端的错误。
- a)视图出错,即views.py页面的对应函数内部出错会显示500错误。
- 网站开发完成需要关闭调试模式,在settings.py文件中:
1
2DEBUG=False
ALLOWED_HOST=['*'] - 显示效果:Not Found
The requested resource was not found on this server. - 自定义错误页面:建立【templates/404.html】 即可,django会自动调用此页面,不需自己调用
系统提供: 用于返回用户请求的path1
2
3
4
5
6
7
8
9
10<!DOCTYPE html>
<html lang="en">
<head>
<meta charset="UTF-8">
<title>404错误页面</title>
</head>
<body>
<h1>页面找不到:--{{ request_path }}</h1>
</body>
</html> - 自定义500错误页:建立【templates/500.html】 即可
1 | <!DOCTYPE html> |
5.捕获url参数
- 进行url匹配时,把所需要的捕获的部分设置成一个正则表达式组,这样django框架就会自动把匹配成功后相应组的内容作为参数传递给视图函数。
- 1)位置参数:参数名可以随意指定
- 2)关键字参数:在位置参数的基础上给正则表达式组命名即可。
1
?P<组名>
- 关键字参数,视图中参数名必须和正则表达式组名一致.
- 【实例】:
https://blog.csdn.net/u010132177/article/details/103831173
的第 二、通过url传参,访问书英雄详情1)加带参数的链接/templates/app1/book.html
【1】通过href属性,把book的id做为参数传给详情页,进而查询对应英雄信息1
2
3
4
5
6
7
8
9
10
11
12
13
14
15
16
17
18<!DOCTYPE html>
<html lang="en">
<head>
<meta charset="UTF-8">
<title>书籍页面</title>
</head>
<body>
本站的图书有:
<ul>
{% for book in books %}
<!--【1】通过href属性,把book的id做为参数传给详情页,进而查询对应英雄信息-->
<li><a href="/detail/{{book.id}}"> {{book.btitle}}</a>:{{book.bpub_date}}</li>
{%empty%}
暂时没有图书!!!
{% endfor %}
</ul>
</body>
</html>2)接收参数,渲染到模板app1/views.py
【00】bookId为接收urls.py必须中指定的参数,来源页templates/app1/book.html
【1】查询主键为url中传过来的参数Id。或写成:id=bookId
【2】关联查询:查询对应书的所有英雄信息
【3】把参数渲染到detail页面去
1 | from django.shortcuts import render |
3)app1/urls.py配置
【书详情页】通过url接收参数2种写法以下两种都可:
【1.关键字参数】参数用尖括号包起来<>path(r"detail/<int:bookId>",views.detail)(视图接收参数必须与此处保持一致,即 bookId)
【2.正则参数】参数必须要带括号re_path(r"^detail/(\d+)",views.detail)
1 | from django.urls import path,re_path |
6.普通登录案例( HttpRequest和 HttpResponse对象的API django.http)
【参考】https://docs.djangoproject.com/zh-hans/3.0/ref/request-response/
0)知识点:views.py视图函数的request.POST、request.GET
- request.POST 保存的是post方式提交的参数 QueryDict
- request.GET 保存是get方式提交的参数
- 它俩的类型 print(request.POST/GET) 返回 QueryDict类型
- QueryDict的传参数方式、调用方式1、调用方式2、
- 调用不存在的值、传入类似列表值、类似列表值调用。
1
2
3
4
5
6
7
8
9
10
11
12
13
14
15
16
17
18
19
20
21
22
23
24
25
26
27
28
29
30
31
32
33
34
35
36
37from django.http.request import QueryDict #引入模块
q=QueryDict('a=1&b=2&c=3') #传参形式
q['a'] #调用方式1
'1'
q.get('a') #调用方式2
'1'
q.get('d') #调用不存在的值,什么都不返回
q.get('d','default') #设置调用不存在的值,返回一个默认的值
'default'
q['d'] #调用方式1调用不存在的值,会直接报错,因此,使用调用方式一get会比较好
'''
Traceback (most recent call last):
File "C:\Users\Administrator\AppData\Local\Programs\Python\Python37\lib\site-p
ackages\django\utils\datastructures.py", line 76, in __getitem__
list_ = super().__getitem__(key)
KeyError: 'd'
During handling of the above exception, another exception occurred:
Traceback (most recent call last):
File "<console>", line 1, in <module>
File "C:\Users\Administrator\AppData\Local\Programs\Python\Python37\lib\site-p
ackages\django\utils\datastructures.py", line 78, in __getitem__
raise MultiValueDictKeyError(key)
django.utils.datastructures.MultiValueDictKeyError: 'd'
'''
q2=QueryDict('a=1&a=2&a=3') #传入类似列表值、及调用
q2['a']
'3'
q2.get('a')
'3'
q2.getlist('a')
['1', '2', '3']
1)显示出登录页面
参考:https://docs.djangoproject.com/zh-hans/3.0/topics/forms/
1) 设计url,通过浏览器访问 http://127.0.0.1:8000/login 时显示登录页面。
2) 设计url对应的视图函数login。
3) 编写模板文件login.html。
url | 视图 | 模板文件
|—|—|—|
/login | login | login.html
2)登录校验功能
1) 设计url,点击登录页的登录按钮发起请求http://127.0.0.1:8000/login_check时进行登录校验。
2) 设计url对应的视图函数login_check:
- 接收表单提交过来的数据。
- 进行登录校验,若用户名密码正确则跳转到登录成功页。若失败在跳转到登录页面。
3) 登录成功后跳转到首页。
url | 视图| 模板文件
|—|—|—|
/login_check | login_check | 无
第1步,app1/views.py编写登陆函数、校验函数
1 | from django.shortcuts import render,redirect #引入重定向简写模块 |
第2步,登录页面模板templates/app1/login.html
1 | <!DOCTYPE html> |
第3步,app1/urls.py设置
【登录页】
【登录检测】
1 | from django.urls import path,re_path |
第4步,把project1/settings.py
把MIDDLEWARE 的 csrf注释掉,否则将无法实现登录。
1 | MIDDLEWARE = [ |
第5步,启动项目进入项目目录
1 | py manage.py runserver |
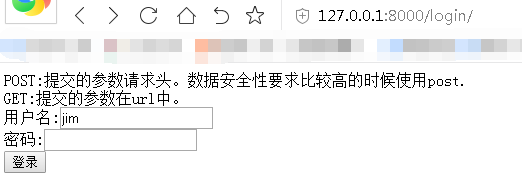
效果 http://127.0.0.1:8000/login/
输入jim 123即跳转到 books/页面,否则跳转回登录页面。
扩展:获取请求的方式是get还是post,/app1/views.py
1 | print(request.method) |
HttpReqeust对象
- 服务器接收到http协议的请求后,会根据报文创建HttpRequest对象,这个对象不需要我们创建,直接使用服务器构造好的对象就可以。视图的第一个参数必须是HttpRequest对象,在django.http模块中定义了HttpRequest对象的API。
属性
下面除非特别说明,属性都是只读的。
- path:一个字符串,表示请求的页面的完整路径,不包含域名和参数部分。
- method:一个字符串,表示请求使用的HTTP方法,常用值包括:’GET’、’POST’。
在浏览器中给出地址发出请求采用get方式,如超链接。
在浏览器中点击表单的提交按钮发起请求,如果表单的method设置为post则为post请求。 - encoding:一个字符串,表示提交的数据的编码方式。
如果为None则表示使用浏览器的默认设置,一般为utf-8。
这个属性是可写的,可以通过修改它来修改访问表单数据使用的编码,接下来对属性的任何访问将使用新的encoding值。 - GET:QueryDict类型对象,类似于字典,包含get请求方式的所有参数。
- POST:QueryDict类型对象,类似于字典,包含post请求方式的所有参数。
- FILES:一个类似于字典的对象,包含所有的上传文件。
- COOKIES:一个标准的Python字典,包含所有的cookie,键和值都为字符串。
- session:一个既可读又可写的类似于字典的对象,表示当前的会话,只有当Django 启用会话的支持时才可用,详细内容见”状态保持”。
运行服务器,在浏览器中浏览首页,可以在浏览器“开发者工具”中看到请求信息如下图:
示例
接下来演示属性path、method、encoding,对于GET、POST、FILES、COOKIES、session后面会有详细讲解。
path、encoding
1)打开booktest/views.py文件,代码如下:
1 | def index(request): |
2)在templates/booktest/下创建index.html文件,代码如下:
1 | <html> |
2)打开浏览器请求,运行效果如下图:
3)以chrome浏览器为例,设置编码如下图,默认为utf-8编码。
method
1)打开booktest/views.py文件,编写视图method_show,代码如下:
1 | def method_show(request): |
2)打开booktest/urls.py文件,新增配置如下:
1 | url(r'^method_show/$', views.method_show), |
3)修改templates/booktest/下创建index.html文件,添加代码如下:
1 | <html> |
4)打开浏览器,输入如下网址:
http://127.0.0.1:8000/
5)浏览效果如下图:
6)点击链接,转到method_show,浏览效果如下图:
7) 回到method_test页面,点击按钮,转到method_post,浏览效果如下图,报错了。
9)回到浏览器中刷新,浏览效果如下图,点击“继续”按钮。
10)最终浏览效果如下图:

HttpResponse对象
视图在接收请求并处理后,必须返回HttpResponse对象或子对象。在django.http模块中定义了HttpResponse对象的API。HttpRequest对象由Django创建,HttpResponse对象由开发人员创建。
运行服务器,在浏览器中浏览首页,可以在浏览器“开发者工具”中看到响应信息如下图:
属性
- content:表示返回的内容。
- charset:表示response采用的编码字符集,默认为utf-8。
- status_code:返回的HTTP响应状态码。
- content-type:指定返回数据的的MIME类型,默认为’text/html’。
方法
_init_:创建HttpResponse对象后完成返回内容的初始化。- set_cookie:设置Cookie信息。
- set_cookie(key, value=’’, max_age=None, expires=None)
- cookie是网站以键值对格式存储在浏览器中的一段纯文本信息,用于实现用户跟踪。
- max_age是一个整数,表示在指定秒数后过期。
- expires是一个datetime或timedelta对象,会话将在这个指定的日期/时间过期。
- max_age与expires二选一。
如果不指定过期时间,在关闭浏览器时cookie会过期。 - delete_cookie(key):删除指定的key的Cookie,如果key不存在则什么也不发生。
- write:向响应体中写数据。
实例
直接返回数据
1)打开booktest/views.py文件,定义视图index2如下:
1 | def index2(request): |
2)打开booktest/urls.py文件,配置url。
1 | url(r'^index2/$',views.index2), |
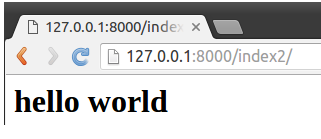
3)运行服务器,在浏览器中打开如下网址。
1 | http://127.0.0.1:8000/index2/ |

如果使用这种方式构造一个漂亮丰富的页面,对于开发人员真是会发疯,于是就有了下面的方式:
调用模板
可以将html、css、js定义到一个html文件中,然后由视图来调用。
1)打开booktest/views.py文件,定义视图index3如下:
1 | from django.template import RequestContext, loader |
2)打开booktest/urls.py文件,配置url。
1 | url(r'^index3/$',views.index3), |
3)在templates/booktest/目录下创建index3.html,代码如下:
1 | <html> |
4)运行服务器,在浏览器中打开如下网址。
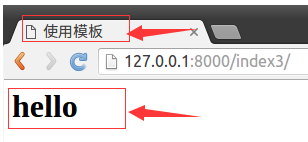
http://127.0.0.1:8000/index3/
运行效果如下图:
调用模板简写函数render
每次调用模板时都要执行加载、上下文、渲染三个步骤,为了简化操作,Django定义了render()函数封装了以上三个步骤的代码,定义在django.shortcuts模块中。
1)打开booktest/views.py文件,定义视图index3如下:
1 | from django.shortcuts import render |
是不是用render()函数调用模板比上面简单多了?